Creating Your First Blog Post; this is the long-awaited part that actually involves the blogging aspect.
If you have followed all the previous steps from 1 to 10, I must congratulate you. The previous steps have set up your admin for good and you do not need to ever go back to them except if you really need to.
We have come to the blogging part that requires daily, weekly, or monthly activity; depending on your posting schedule from your blogging business plan.
This part is similar to creating Pages, but while Pages are static, do not require updates, and do not rank on search engines, Posts do.
What you should do before starting a post.
Research the Topic
At the beginning stage of blogging, you might be tempted to post about anything that comes to mind, but remember that you have a niche and a content plan. The example niche I have been using in this blog is a fashion niche, focused on plus-size women.
Yes. Research the topic, and ask questions. You could use your social media post to ask or ask family and friends or simply ask a plus-sized lady for a piece of first-hand information on your topic.
You want to know if people have a problem here, such that when they see your topic anywhere, they will be interested in reading and maybe even buying from you.
Keyword research
A keyword is a set of 2-7 word phrase or clause. There are short-tail (1-2), medium (3-4), and long-tail (5-7) keyword. Aim for a long-tail keyword as most short ones are already saturated and you may find it difficult to rank the post on search engines.
You want to make sure that the focus keywords you will be using in your blog post are related or actually what people are searching for. To get this information, there are paid and free keyword research tools. The free tools include;
These free tools (though not sufficient, but ok for a beginner) will help you discover related keywords you can add in between the text of your post body.
Craft Your Blog Post Topic
Craft your topic in a way that will make a reader click on it. To analyze your topic text, use this headline analyzer tool or use this tool to craft your topic ideas.
Now that you have done that, let’s create your first post.
To create a blog post;
- Go to the left sidebar of your admin and click on Posts → Add a New Post.
This opens a blank post. Use the Screen Options to close any screen elements you do not want to see.
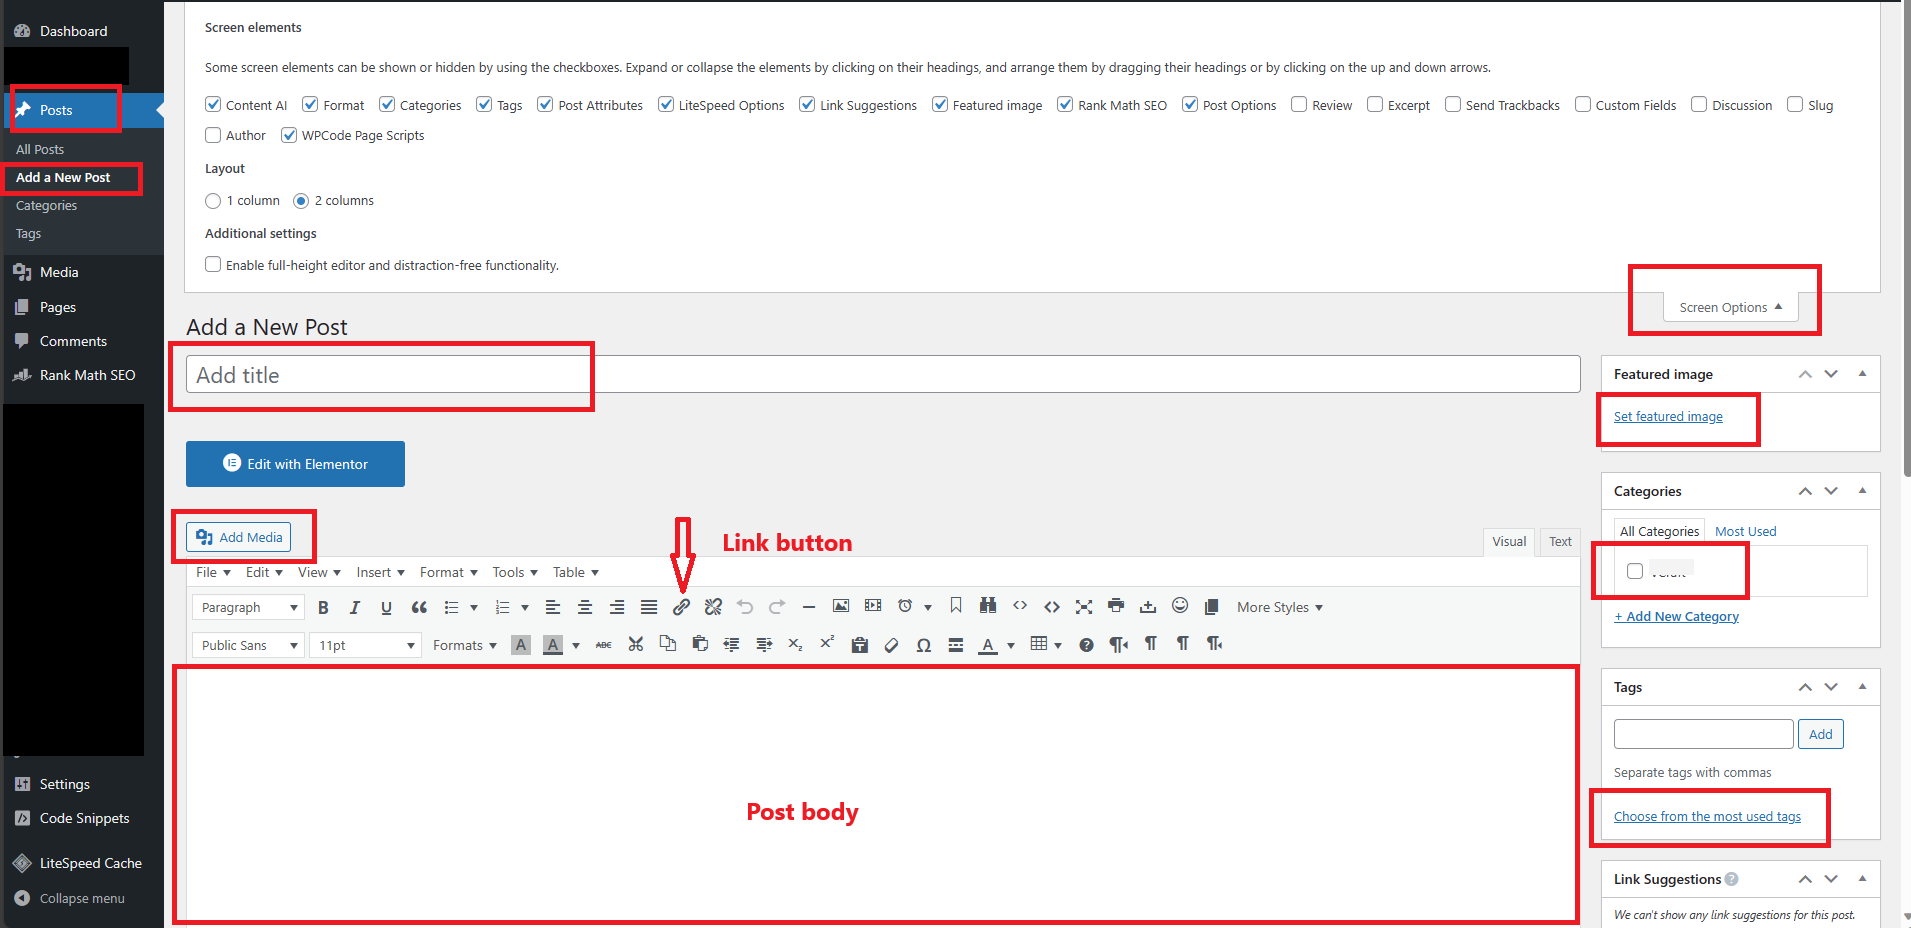
2. Add the post title, for example, “Best office wears for plus size women“. This automatically creates a Permalink (https://goodlooks.com/best-office-wears-for-plus-size-women) for you. If your permalink is too long, you can edit it as you wish, but ensure that your focus keyword is included.
- Note that, once published, you cannot change the extra text (best-office-wears-for-plus-size-women) included in your permalink anytime you wish without repercussions. Changing that will affect your ranking for your blog post. Not to mention the time it will take you to find all the locations of the internal links linked to that particular post to avoid having 404 error posts.
- Select your Category and relevant Tags.
3. Write the post body. Notice the word count as you write. You can write as many as you wish.
4. Add media wherever you wish to have any and add your focus keyword in the Title and Alt Text of every image. Add FEATURED images to your blog posts.

- To add media, click the add media button at the top. Choose the media you wish to add or click the Upload files or Insert from URL to upload an image.
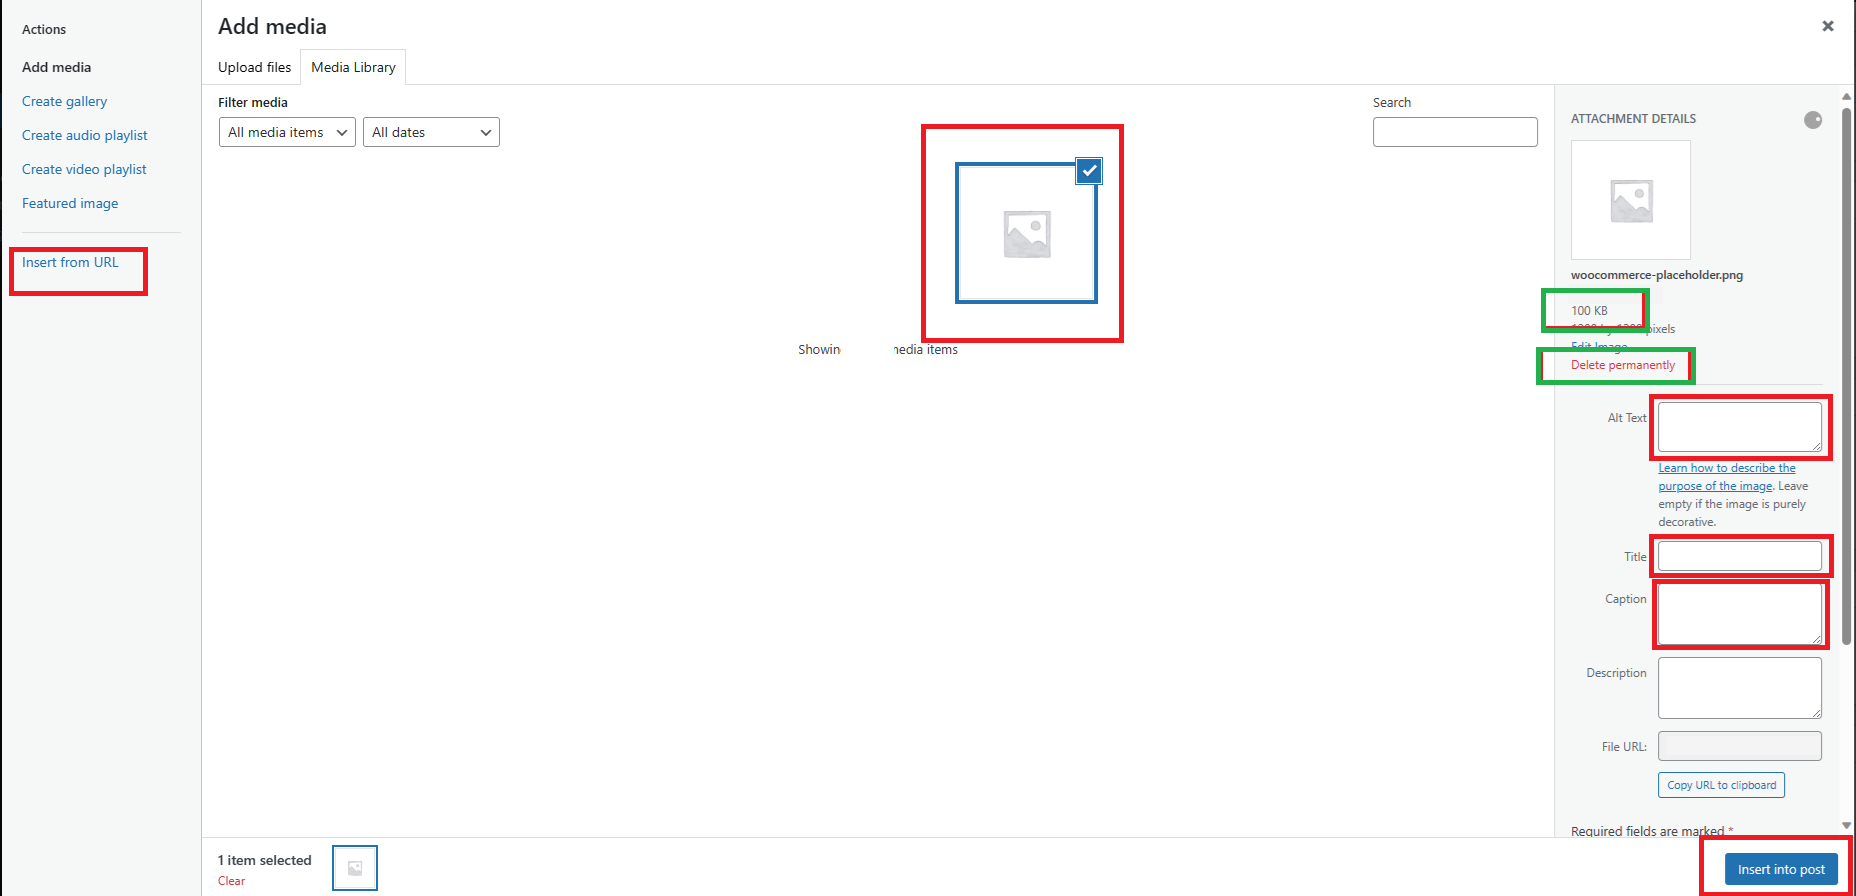
- After uploading the image, select the specific image you want to add to the post. On the right sidebar, add an Alt Text and Title. This is basically a description of the image. Ensure to add your focus keyword to it.
- Notice the image size is 100kb, ensure to keep your image size below 200kb. You can reduce your image size here.
- You can click on the delete permanently to remove a particular media from your storage.
- If you got the image from another website, use the proper attribution to accord the original owner of the image in the Alt Text and Title text.
- Adding a Caption is optional to you. Click Insert into post to add the image to your post.
5. Add internal and external links. Select the text you wish to add a link to, then click the link button as shown in the image above. Add the link and “apply” to save.
- Internal links are links connecting to published posts/pages on your blog.
- External links are links connecting to published posts on other people’s blogs.
- For internal links, since this is your first post and you do not have other blog posts to link to; I suggest that you link to an about or contact page.
- For external links, you can use your blog’s WhatsApp number (https://wa.me/+234**********). The “*” represents your number without the first “0” if you are Nigerian and the 234 represents your country code.
6. Click on the Rank Math SEO. Add a Focus Keyword, for example, “Best office wears“. This keyword should appear in different parts of your post. Follow the list below to assist you. As you complete the requirements, the colour turns from yellow to green and your score increases. Target getting an 81 score, but even if you can’t, do not worry yourself.
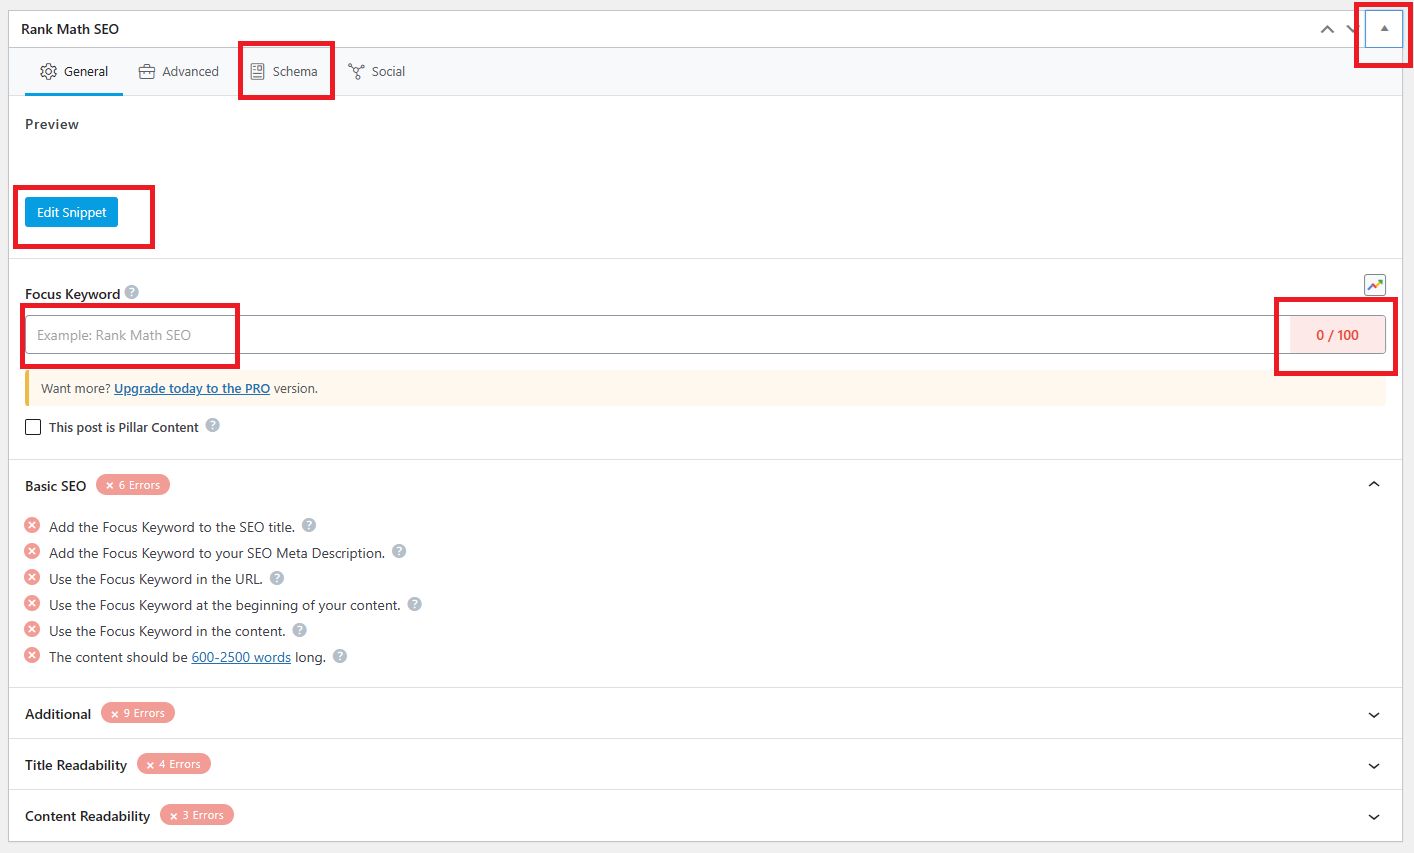
7. For “Edit Snippet“; this contains the text that appears below your title when you search for something on search engines. Be creative about it but ensure it contains your focus keyword.
8. Click on Schema to change the schema markup, if needed. This is basically how search engines understand your content type. A blog post will automatically have an “Article” schema markup.
- For the free version of Rank Math, you can only use one schema markup per post. So, if your post is a product, you will have to delete the “Article” schema markup and add a “Product” schema markup.
9. The Rank Math Link Suggestions will only appear when you have published the post or you selected a category that has a pillar content in it. So to see related internal links you can add to your post, first publish, then edit, and update the post to add any link you still wish to add.
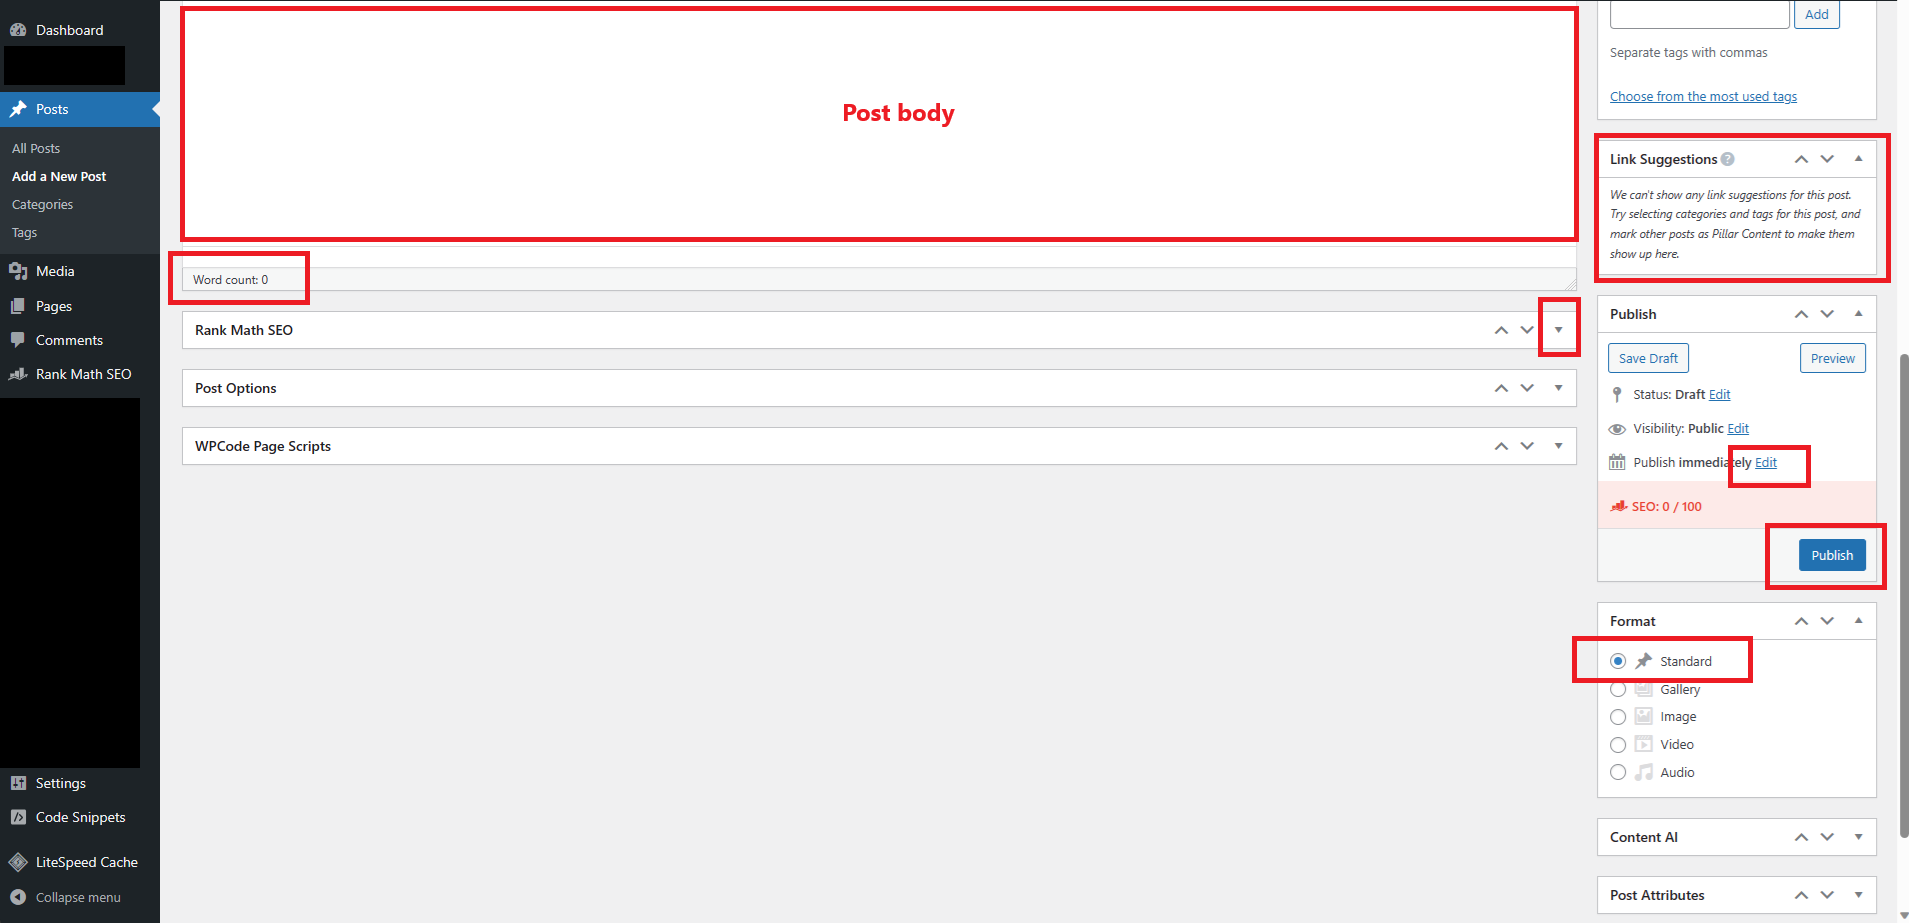
10. You can leave the default post format at Standard or any format of your choice. This post format will only take effect if your blog theme allows it to function.
11. Based on your posting schedule, you might be creating posts but you are not ready to publish them immediately (then click Save Draft) or you want it to go live say, tomorrow. But you don’t want to come around and click the publish button, then click “Publish immediately Edit“.
- This will bring up a date and time. Set it to your desire. The clock works as a 24-hour clock. So, if you want to post by say, 2 o’clock in the afternoon of the next day, you will enter “14 : 00” and not “02 : 00“. There is no pm and am there.
- Click Ok. Next, click on Schedule, to schedule the post to go live the next day.
12. If you do not wish to schedule your post, skip number 11 and click “Publish” to make the post go live.
Do this for as many posts as you want to create.
***
Create as many “quality” posts as you can.
Each post should be a minimum of 700 word count.
Create up to 15 – 25 posts before going to the next Step 12.
But if you already have the above-listed number of published posts, then go ahead.
***
Disclaimer: I do not have any affiliations with the domain name goodlooks.com. It was merely used for explanation purposes.
***
Now that you have gone about creating your first blog post, let’s go to the next steps.
Step 12: Submitting Your Blog to Search Engines.
Step 13: Setting Up Google Analytics for Your Blog.
Step 14: Choosing Your Monetizing Platform.
***
Happy blogging…


